Information Sharing Portal
Contents
- 1 Operational Web Portal Manual
- 2 Entering Data
- 3 Codes management
- 4 Webservices
- 5 Quick Manuals
- 6 Visitor Statistics
Operational Web Portal Manual
This document is by no means complete. These guiding notes are meant to assist remembering the steps an Information Manager has to complete to set up, administrate and maintain the portal. This wiki can be used as a baseline to create user guidelines and Standard Operation Procedures for clearing and posting content.
The portal is continuously evolving, so some of the steps described here, might be outdated in a few months time. It is recommended to complement and update this guide on regular basis to assist newly deployed Information Managers with the Set Up and the Maintenance of the Portal.
The Information Sharing Portal is build around:
A front page that gives access to 8 distinct dashboards
- Regional Dashboard
- Country Dashboard
- Region Dashboard
- Settlement Dashboard
- Partner list Dashboard
- Partner profile Dashboard
- Working Group profile Dashboard
- Context Map Dashboard
An administrative panel where portal administrator can enter data and configures the settings. It is accessible only to authenticated users.
All modifications can be done in Admin panel/Dashboard settings, Admin panel/Data navigation matrix and Admin panel/Customize language text. As a first step, the e-mail address in Dashboard Settings/Footer should be updated. Things to consider:
- Do you need a 'Regional' page or not? (Dashboard settings/Global settings/Regional settings)
- Do you want to enable the french version? (Dashboard settings/Global settings/Language)
- Would you like to have a link to the partner list in the main navigation bar or not? (Dashboard settings/Global settings/Navigation bar)
- Would you like to display a link to the regional appeal document? (Dashboard settings/Regional/Regional Appeal)
- Can you display the figures for new arrivals? (Dashboard settings/Every level/Population figures)
- Can you display the figures for households? (Dashboard settings/Every level/Population figures)
The admin panel (with full administrative privileges) is as folllows
Entering Data
Location & Geography
- Countries should have been already added to the instance, but if something is missing, it can be added through Admin panel/Locations Settings/Portal Countries.
- The already added Countries of Origin can be found at Admin panel/Location Settings/Countries of Origin. Please check if you have all the countries that are needed.
- The next step is to add the regions. Please make sure that you record the name in accordance with the spelling used in proGres. You can search for an existing location information record to assign with your newly created region by determining the country and the administrative unit level (see mg: Administrative Units). In case you couldn't find a matching record, leave it blank. After this you have to determine the Location centroid either by trying to find a matching record in the GeoNames database, either by specifying the latitude and longitude coordinates of the center of the region in decimal degrees. This is necessary for the maps on the portal to work properly.
- After adding the regions, you can add the sites. Please make sure that you record the name in accordance with the spelling used in proGres. Then please determine the Location centroid for the settlement as well.
Define the country to be used

Add the required country:
- Click on “Admin panel”
- Select “ Location Settings”
- Select “Portal Countries”
- Click on “Add New Country”
- Select the name of the country you would like to add.
- Click Add
Select the following options
- Publish Total Figures and Regional Population Bubbles
If set to 'ON', this country will appear on the main regional page. It will be listed as a circle showing refugee population, and the figures will be included in the total refugee population and demography. If this is set to 'OFF' the refugee population of this country will not be included in the total figures or the demography table.
- Publish in Navigation Bar and Add Country Page
If set to 'ON', this country will appear in the top navigation bar. It will be possible to click on this bar to proceed to the detailed country page.
- Used for Country of Origin drop down
If set to 'ON', this country will appear in the drop down for country of origin
Define the operational region and link it with a known region
- Click on “Admin panel”
- Select “ Location Settings”
- Select “Region”
- Click on “Create New Region”
- Type in the name of the region you would like to add
- Select the country
- If you know the 'administrative level' of the region, you can search for additional geographic location information for this region. This is optional
- Add the regions centroid by dragging the marker on the map or putting in the latitude and longitude directly
- Decide if this region should be published or not
- Click Add
Define & describe a settlement

A settlement can be of different type:
- Country Entry point* Transit Site* Reception Center - for transitional camp* Refugee Camp* Dispersed/Rural location* Urban location* Temporary Location* Planned Camp
Population Information
Normally the population figures are added at the level of settlement and then automatically aggregated by the portal to the region, country and then the regional level. In certain cases, when the frequent update of numbers on the settlement level is problematic, a special kind of settlement can be created (named after the region or the country, depending on the information available) and populated with the figure of a higher level. However, this should only be a solution for a shorter period of time.
Add population number

- Click on “Admin panel”
- Select “ Refugee Population Data”
- If the Location and Origin record does not yet exist click “Create New Settlement Record”.
- Fill in the relevant data in the appropriate fields. Note that the Update date defaults to Todays Date. Make sure that the date is the date for which the data was reported
- When you are done, click “Save”
- Check that the data appears correctly on the website.
Note: if there is no households number at all in the records, 'N/A' will appear in the modules. To avoid this, displaying of household figures can be switched of for each level individually in “Admin panel/Dashboard settings”.
- If you would like to display a time graph of the population figures, you have to create a “history” for each location you'd like to see as a timegraph.
To do this, you can either click on the “Create New Settlement Record” from the main population grid, or you can click on the “Edit” button in the relevant record of the grid. Editing an existing record from the main grid will create a new record with the same Location and Country Origin data, but with different dates and population figures. The population record with the latest date will show as the current population figure on the portal. Records with any dates prior to the most recent date will appear in the population history chart.
Note: you have to switch on the master switch for the timegraphs in the “Dashboard settings”, on the “Global settings” tab.
- If you want to correct or change a historical record for a particular Location and country of origin, click on the “History” button next to the record you want to update, and then click the “Edit” icon of the record you wish to change. Editing a record in the “History grid” will overwrite the existing data. Editing a record from the main population grid will update the figures, creating a new record in the history grid.
Note: You can export the whole table to an Excel sheet with the “Export” button at the bottom of the grid. If you've previously filtered the table, the result will be exported. A feature to import the data from excel back into the portal is current under development.
Different type of settlement can be used
Clearance process
For population statistics from proGres registration systems:
- Population statistics need to be approved by the Registration Officer and Head of Field Office and then disseminated to the Information Manager and Registration Manager at country level.
- At country level, the population figures in the portal will be directly and promptly updated by the Information Manager or the Registration Officer.
For population statistics based on estimation:
- Population Estimates can be developed through various method (headcount, satellite imagery, profiling through a sample, etc.)
- Population Estimates need to be approved by the Head of Field Office and then sent to the Executive, cc'ing the Information Manager, the Registration Officer and the Senior Protection Officer.
- Upon approval from the Executive, the Information Manager or the Registration Officer will update the web portal with the population estimates.
Population type
For population statistics concerning non directly affected population (i.e. for instance hosting families in non-camp context):
- non directly affected population can be estimated through various method (headcount, profiling through a sample, etc.)
- Such figures can be used for the planning of distribution.
Add a vulnerability figure

Displays the data of vulnerable PoCs in a table format.
- Click on “Admin panel”
- Select “ Refugee Vulnerability Data”
- Click “Create New Vulnerability Record”.
- Fill in the relevant data in the appropriate fields.
- When you are done, click “Save”.
- Check that the data appears correctly on the website. Don't forget to make sure that the module “Vulnerability” is switched on.
Note: you can change the title and the footer of the table in “Admin panel”/”Customize Language Text”. The fieldnames begin with 'Vulnerability.
Add a repatriation figure

- Click on “Admin panel”.
- Select “ Refugee Repatriation Data”.
- Click “Create New Repatriation Record”.
- Fill in the relevant data in the appropriate fields. At the moment, you can record voluntary assisted and voluntary spontaneous returns.
- When you are done, click “Save”.Note: you can adjust your graph in “Admin panel”/”Dashboard Settings”/”Global Settings”/”VolRep Module”.
- Check that the data appears correctly on the website. Don't forget to make sure that the module “Vulnerability” is switched on.Note: you can change the title and the footer of the graph in “Admin panel”/”Customize Language Text”. The fieldnames begin with 'VolRep.
- Clicking on the items on the legend shows/hides the different series and the graph rescales accordingly.
Add an arrival figure

Arrival Trends are displayed at the Region level. They do not have origin breakdown.
- Click on “Admin panel”
- Select “Arrival Influx Data”
- If a record for a Region already exists, click on “Edit”. If the record does not exist click “Create New Record”. Normally the record would already exist. There should only be one record for each Region.
- Enter the data in the grid
- When you are done, click “Save”
- Check that the data appears correctly on the website.
Add a disclaimer

Disclaimers and data sources can contain additional information or metadata about the population figures, the whole emergency, the country, region or settlement.
- Click on “Admin panel”.
- Select “Data Disclaimers and Data sources”.
- To add a new disclaimer, click on the “Add New Disclaimer” button.
- Fill in the appropriate fields: the title is optional, if provided, it will appear in bold on the page. You can either choose a specific location or choose to show the disclaimer on every page of the level. (e.g. every country page if you've chosen 'Country' as page).
- If you are creating a country text, you can define if the disclaimer should appear on the Regional page or not.Note: this option is only available when you are using the 'Regional bubbles' module to show the population breakdown as opposed to the 'Regional graph breakdown'.
- You can also specify the colour of the left, bold border of your new disclaimer.
- Click on “Submit”
Partners & Activities
Every partner entry consists of at least two distinct records: a record for the main organization and at least one record for a branch (see How to add partners). It is possible that the main organizations are already populated in your instance to some extent. First you should check your existing records at Admin panel/Partners. There must be at least one branch to every main organization to be available in the 3W menus.
Populating the 3W Activity grid is very important to make our partners visible on the portal. Even if you currently don't have figures for the settlements, you should add the partner activity details.
Partner profile and contact information data

- Partners may submit a request to the Information Manager to update their organization's information in the portal.
You can add Partners with whom you work. The partners are also used for the Who does what where information. All partners will appear in the Partner list. Partners for whom specific activities in specific locations have been recorded will also be displayed in the Region and Settlement pages.Regarding partner information, there are two definitions you should be familiar with: main organization and branch. Essentially every partner you create should consist of two parts: a main organization and at least one branch. For example: if you have Red Cross Belgium and the American Red Cross working in your country, your main organization could be Red Cross, with two branches: RC Belgium and ARC. The other case would be when your partner is working in more than one country in a regional emergency, and they would like to have separate pages and access. In that case, the main organization (e.g. CHF) will have two branches for the two countries (CHF Jordan for Jordan, CHF Lebanon for Lebanon).The last case is when you have one partner working in one country. The main organization and the branch will exist in this case, too; the admin is required to create only the main partner, the branch is created automatically.
To add a main organization:
- Click on “Admin panel”
- Click on “Partners”. You can see the main organizations in the grid, and also the branches if you click on the “” sign at the far left side of the row.
- If you want to edit or delete an existing organization, find the partner in the list and click on “Edit” or “Delete”. Note: if you delete a main organization, all of its branches will be deleted!
- If you want to create a new organization, click “New Partner”.
- Fill in the form.
- Click “Add” to save
To add or modify a branch:

- Click on “Admin panel”.
- Click on “Partners”.
- In the row of the desired main organization, click on “View”.
- You can add a new branch office for this partner by clicking on the “New branch office” button.
- If you would like to edit or delete one of the existing branches, click on the “Edit” or “Delete” button in the name row of the appropriate branch.
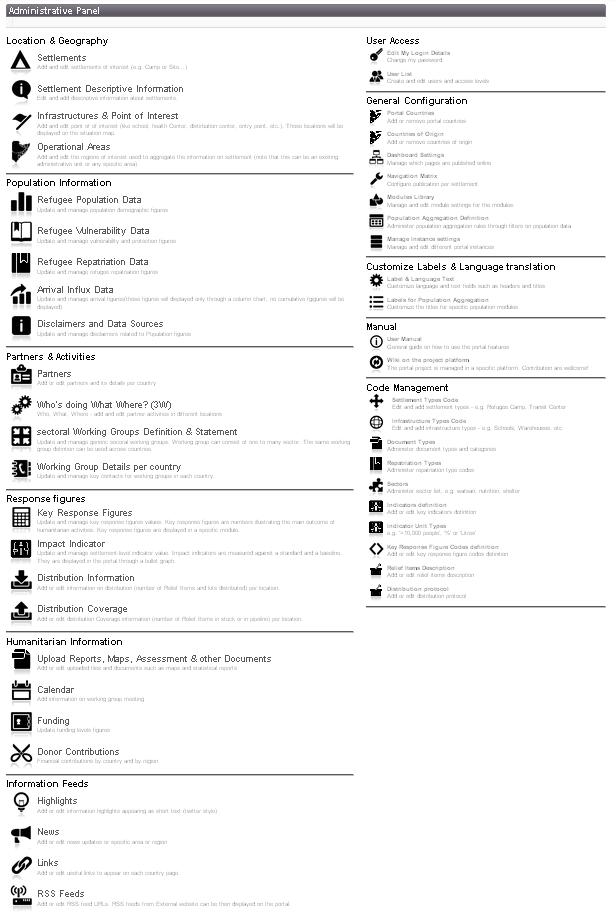
Who Does What Where information

You can add information about who does what where. It is possible to select which partners are operating in which locations. The 3W information is displayed in the partner list and in the Region and Settlement pages.
This information needs to be cleared using the following process:
- A partner makes a change request either to the Sectoral Lead or the Information Manager.
- The Sectoral Lead or Senior Programme Officer may request confirmation from the Head of Field Office of the partner's role in operations.
- If approved by the Sectoral lead or the Senior Programme Officer, the Information Manager will update the data.
- Click on “Admin panel”.
- Choose “Who's doing What Where”.
- If you want to edit or delete an existing activity, find this activity in the list and click on “Edit” or “Delete”.
- If you want to create a new activity click “Add Activity”.
- Fill in the form
- Click “Save”
Working Group
Working group pages allow information to be grouped by a combination of sectors, themes and geographic areas

- Navigate to 'Sectoral Working Group Definitons & Statement' in Admin Panel and create a working group
- Fill out the name field
- The 'About/Description text' field can hold the vision and mission statement of the working group
- Select one or more locations for the working group
- If the new group is a sub-working group of an already existing one, you can select it in the drop-down
- Add sector(s)
- You can allocate a maximum of two chairing organizations for the working group. Their logo will appear on the page.
- The visibility of the new working group's modules is customizable by the checkboxes. However, the layout of the working group page is standard and can only be changed from the code.
Working Group Contacts

- You can add 'key contacts' to a working group page by clicking on the 'Working Group Contacts' on admin panel.
- Enter contact information. Working group pages are added at the country level, so make sure to select which country page this contact will appear on.
- You can now add the 'Working Groups List' module to the Country Page from page layout. This adds a module displaying links to each working group.
- As of now, the sector logos in the 3W will not be linked to the WG pages.
Response figures
Indicators

- The selection of which indicators will appear in the portal will be recommended by Sectoral Working Group at the Country level.
- The Sectoral Lead will submit the request to update the indicator data in the portal to the Executive, cc'ing the Information Manager.
- The Information Manager may also initiate the updating of indicator data, proposing new indicator values to Sectoral leads for clearance, prior to submitting the indicators to the Executive for approval.
- As needed, the Information Manager will provide advice to the Executive and the Sectoral Lead about the relative reliability of indicator data sources or other technical issues.
- Upon Executive approval, the indicators in the portal will be updated by the Information Manager.
The exception to this process is if the Executive gives indicators from particular sources “blanket clearance”- see below for details.
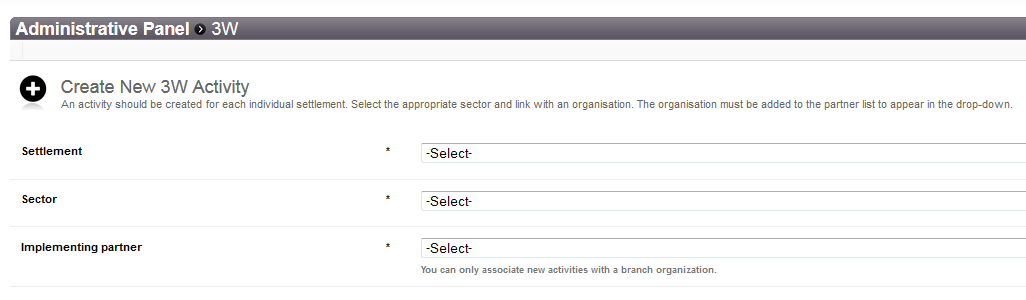
- Click on “Admin panel”.
- Select “Impact Indicators”.
- If you are choosing one of the existing indicators, just click “Edit” beside the corresponding indicator and fill in the new value. Be sure to update the date and the source data.
- Choose “Add Indicator Data” if you are creating a new indicator for the website that previously did not exist for that location. Select the indicator and fill in all the information, including the location where the indicator is applicable, the date of the indicator and the source information.
- When the form has been completed click “Save” to save the data.
- Verify that the indicator displays correctly.
Note: You can export the whole table to an Excel sheet with the “Export” button at the bottom of the grid. If you've previously filtered the table, the result will be exported.
Distribution

- Describe the core relief Item and define a distribution protocol.
Basically, you need to develop a distribution protocol in order to create then "distribution event" based on this protocol
 . CORE relief item can be a subset and/or combination of the relief item list.
In CORE relief item, administrator can define both the country where those Core Relief Items are used and the ratio that is applied for that specific country.
Administrators will need to define:
. CORE relief item can be a subset and/or combination of the relief item list.
In CORE relief item, administrator can define both the country where those Core Relief Items are used and the ratio that is applied for that specific country.
Administrators will need to define:
- ratio type : two types of ratio * description : an additional field to describe if needed the ratio)
- Create Distribution Event and fill distribution information

In order to be able to track the numbers, create an event for every distribution with different partner and date. This is done through the page Distribution Events on the admin panel. Once you've created your event, you can use that to associate any number of settlement and core relief item with it on the page Distribution Information. If you would like to record a distribution, first you have to select on the top of the page the distribution event and the settlement you want to link the distribution to. After that you can enter the numbers of beneficiaries that received the kit for each of the locations.
- Enter Distribution Coverage Information
The stock and pipeline numbers should be prepared for recording via SQL queries with the Excel sheet named stock_pipe_to_sql.xls. You can also record or modify the distribution coverage directly from the admin panel in menu Distribution Coverage. Please note that in case an item is not allocated to a settlement , you must select "No region" or "No settlement" options in the dropdown menus, respectively. Allocated country should always be defined.
Humanitarian Information
Documents
You can upload updates, maps, statistics, reports&assessments an funding documents. The documents can be tagged by language, sector, type an organizations and location, which are used on the 'View All Documents' page as filters.

You can upload any type of document to the web portal, including statistical data. The allowed file formats are doc, xls and pdf with a maximum file size of 15MB. “Blanket” Clearance
- The Executive, at any time, may give blanket clearance to a regularly produced particular type of report or document for posting in web portal by notifying the Information Manager and the relevant Sectoral Leads.
- Reports and documents that have been given “blanket” clearance may bypass the Executive approval process and be directly posted in the portal by the Information Manager upon request from the Sectoral Lead.
- The Executive may revoke “blanket” clearance at any time by notifying the Information Manager and the Sectoral Lead.
sector-specific assessments
- Recommendations for posting sector-specific assessments will originate with sectoral groups, both at the Addis Ababa and Field levels, based on consensus among the group. The Chair of the Sectoral Group will forward the suggestion of posting sectoral information to the Executive, cc'ing the Information Manager.
- The Executive may consult the Senior Public Information Officer or other Sectoral Leads in the decision about whether to post the information or not.
- It is possible that the Executive may agree to post a portion of the information and not the suggested information in its entirety.
- Upon approval of the Executive, the Information Manager will post the information in the web portal. Credit to the source organization of the information will be given in the portal.
- It is the responsibility of the Chair of the sectoral group to communicate the decisions of the Executive to post or not post the information back to the sectoral working group.
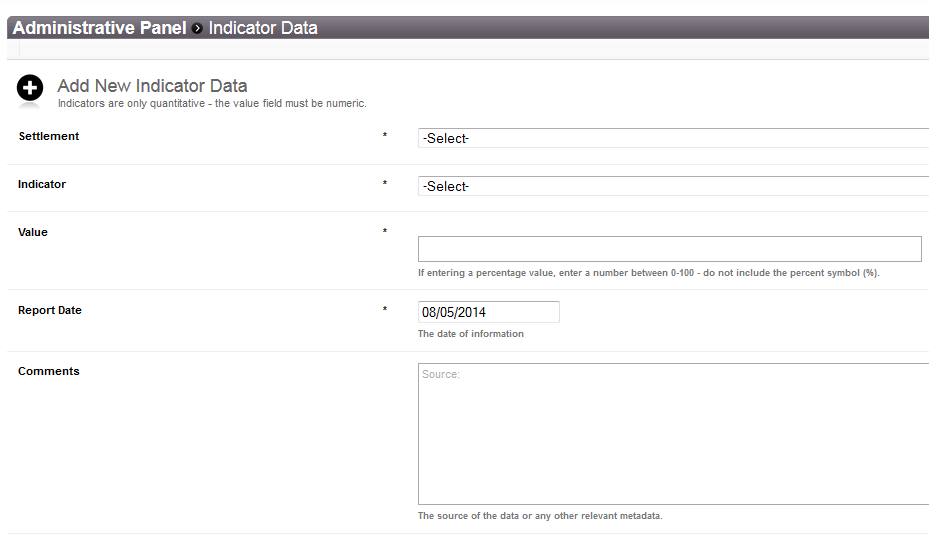
To upload a new document:
- Click on “Admin panel”
- Select “Upload files and documents”
- A page will result where you can see all the documents that have been uploaded thus far to the portal. If you wish to change the metadata for an existing uploaded document, you can look for the document in the grid and then modify it.
- If you wish to upload a new document, click “New Upload”
- Fill out the appropriate information on the next page. Be sure to put the date of the report into the date field, not the date of the upload. This will help sort the reports in the correct order on the website.
- Please choose a standardized title for the document. To look nice, similar styles of titling documents should be adopted, so the same type of document doesn't have different naming styles
- Click on “Browse” and browse to the correct location on your hard drive.
- You can tag the document with language, sector, type, organisation or any kind of tag defined at “Admin panel”/”Document Types”.
- You can define the appropriate settlement, region and country for your document, although these are optional.
- If the document pertains to the whole situation and you wish to show it on the Regional page, tick the appropriate box.
- Click “Save” when done.
- When finished, navigate to the area where you wanted the document to appear and confirm it looks correct.
- If you want to change the uploaded document you will have to delete the record and upload the document again, following the above steps.
You can find a more comprehensive guide on document uploads in the Quick Manuals section.
Calendar
The calendar can be used to publish meeting dates. The calendar can be displayed at the Country or Region level. It is possible to schedule stand-alone or recurring events and meetings as well.
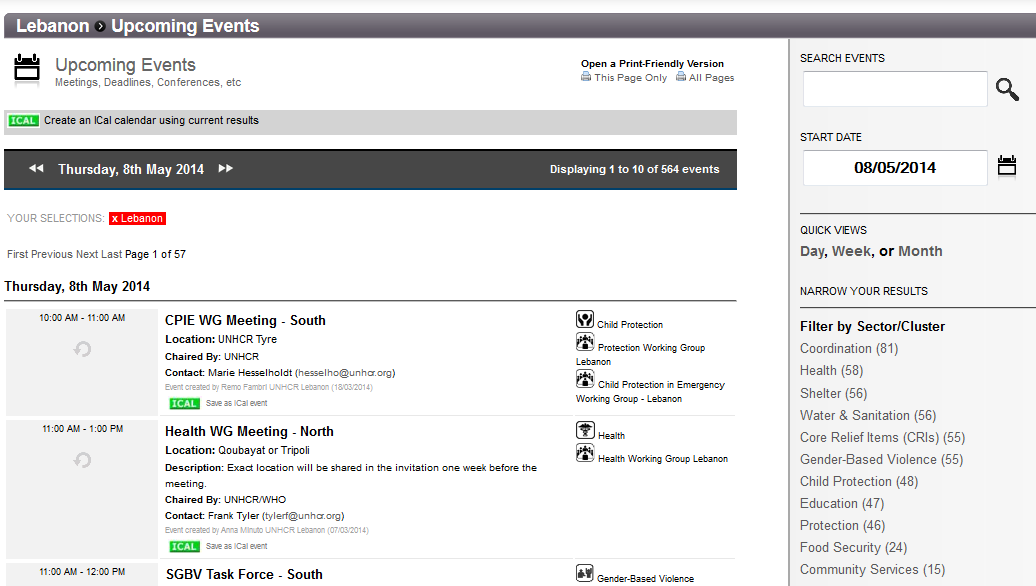
- Click on “Admin panel”
- Click on “Calendar”
- To add a new event, click on “Add new event”. Fill in the relevant information.
- If you specify the related sector information, you'll be able to filter your events by sector later.
- When you have filled in the form, click “Save Event”.
- To modify an existing meeting, click on the pencil icon beside the meeting record in the event list.
Note: When creating a recurring event, you have to make sure you specify the right settings for the frequency you want to achieve. For example, you wish to set up a meeting for two Tuesdays in a month. In that case, you should not use, 'repeat every 2 weeks', unless you want to do precisely that, regardless of frequency of Tuesdays in that month. If you want an event on the 1st and 3rd Tuesday of a month, then you must create a monthly repeating event repeating on the 1st Tuesday every 1 month, and then create another event repeating on the 3rd Tuesday of every month. This involves creating 2 events - to make this process easier, there is a 'Create Similar Event (copy)' button, alongside the 'Edit' and 'Delete' icon buttons on the calendar grid. First you have to create an event repeating on the 1st Tuesday every 1 month, then in the event list, click “Create similar event ”. The event title etc details will be already filled in - you just need to change the start date and repeat frequency to every 3rd Tuesday every 1 month.
Funding
 The funding module can be used to publish information on the financial coverage of the situation. The graph can be displayed at the Country or Regional level.

- Click on “Admin panel”
- In the “Humanitarian Information” section, choose “Funding”
- On the next screen, you can edit existing records or you can create a new one by clicking on “Add New Funding Record”
- Every field is mandatory, although the Shortfall will be calculated automatically.
- Click “Save”
Donor Contributions
 The Donor contributions module can be used to publish a breakdown of financial contributions from various donors. The result will be a table that can be displayed at the Country or Regional level.
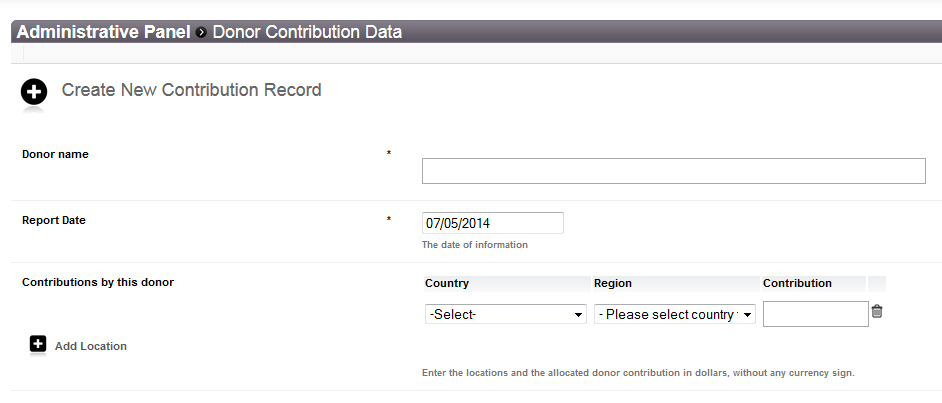
- Click on “Admin panel”
- In the “Humanitarian Information” section, choose “Donor Contributions”
- On the next screen, you can edit existing records or you can create a new one by clicking on “Add New Contribution”
- You can indicate the Country only, although when displayed at the country level, the figures are grouped by region, therefore if you leave the region empty, the grouping will not render correctly. At the Regional level, the contributions are grouped by country.
- Click “Save”
Information Feeds
- Adding highlights: highlights are short messages, usually no longer than a short text message, 160 characters. They can be related to a region or the whole country. Please select one or more relevant sectors if you can, because this will be very helpful when the 'search by sectors' feature will be introduced.
- Adding news items: news can be a little longer articles uploaded by any portal administrator, accompanied by a picture.
- Adding an RSS feed: There is an option to automatically display the country's information on the portal through an RSS feed from external sources, like the main UNHCR site's country page. To add this, the link to the RSS feed must be copied from the relevant country page from the main UNHCR site and inserted as a new record in Admin panel/RSS feed/Add New RSS Feed. The title is optional, but the displayed number of items should be determined.
Highlights

Highlights are “bite-sized” news flash type pieces. In order to remain relavant, Highlights should not be confused with news Highlight messages will be limited to 160 characters.
- Highlights can be suggested directly by Sectoral Working Groups. The Chair of the Sectoral Working Group can email the text for the “Highlight” to the Executive for approval, copying the Information Manager.
- If the Executive approves, the Information Manager will post the “Highlight.”
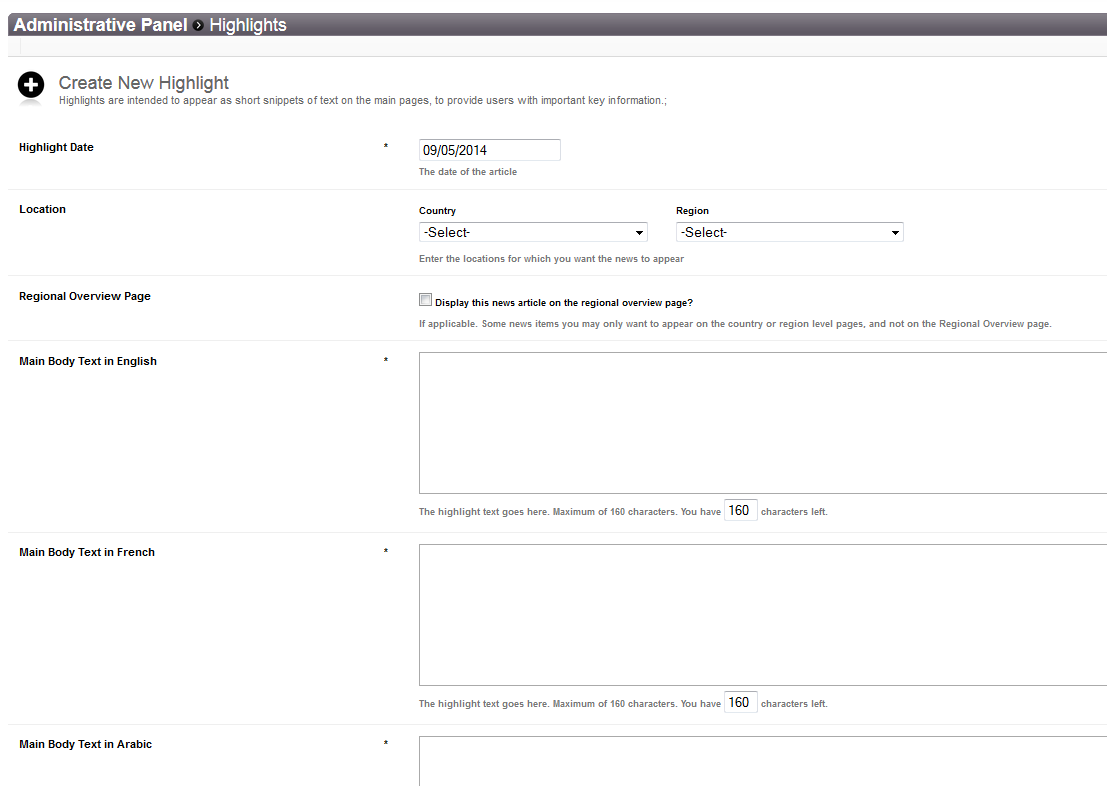
- Click on “Admin panel”
- In the “Information Feeds” section, choose “Highlights”
- In the next screen, you can edit an existing highlight or you can create a new one by clicking on “New Highlight”
- Choose the Region, the country and then type the body of the highlight. In the body of the highlight, again indicate to which location this highlight pertains ” at the end of it. Highlights should be short and concise, one or two sentences maximum.
- Click “Submit Query”
News
![]()
The Senior Public Information Officer should suggest news items that should be published.
- For news items on the UNHCR public website, these can be directly uploaded to the website by the Information Officer upon receiving a request from the Senior Public Information Officer.
- For news items from non-UNHCR websites, the Senior Public Information Officer must first clear the request with the Executive before the Information Manager will upload the news item to the website.

- Click on “Admin panel”
- In the “Information Feeds” section, select “News”
- If you want to edit or delete an existing News Article find the article in the list and click on “Edit” or “Delete”
- If you want to post a new News Story click “Create New Article”
- Fill in or modify the information in the form.
- Settlement and Region are not mandatory fields. If they are blank the article will only appear at the higher level.
- You can define if you want to display the story on the Regional page or not by modifying the checkbox.
- If you want to add an image next to the story browse to the relevant picture and add it. Please note that the picture size should not be too large. TIFF and BMP files does not work. Choose e.g. JPEG.
- When you have filled in the form save the story by clicking “Submit”.
- Verify that the story appears in the right place.
Links

It is possible to create links to other websites, e.g. UNHCR public website.
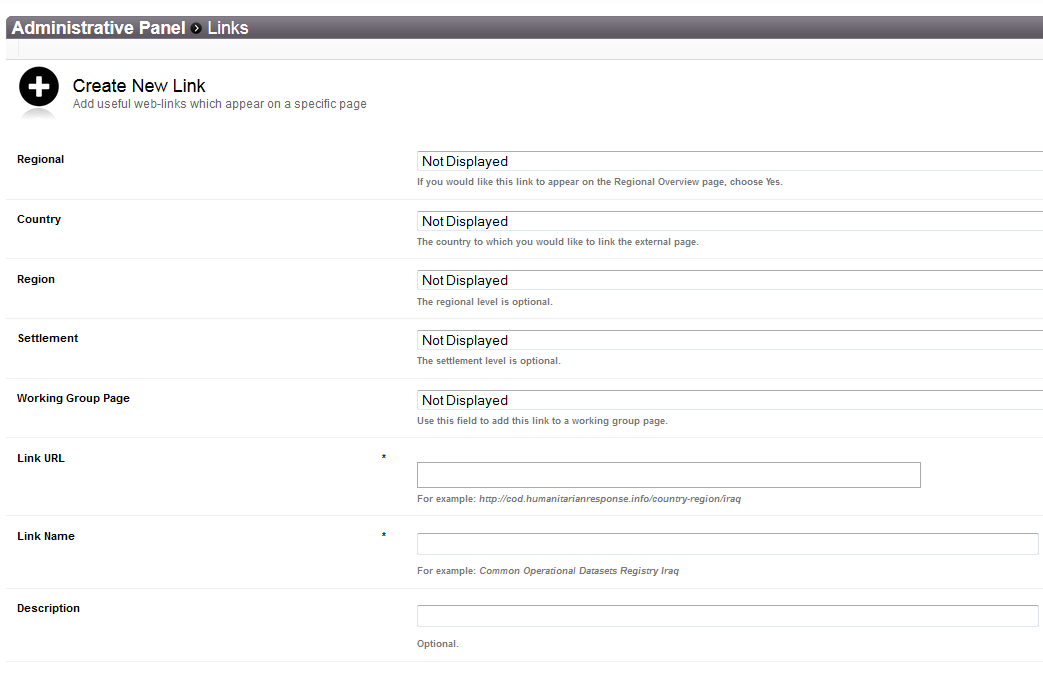
- Click on “Admin panel”.
- In the “Information Feeds” section, select “Link”.
- If you want to edit or delete an existing Link, find it in the list and click on “Edit” or “Delete”.
- If you want to create a new link click “New Link”.
- Fill in or modify the information in the form.
- You can define the locations to which you would like to assign the link.
- The Link Name is the text which will appear on the website.
- Click “Save” to save the link.
RSS Feed
This functionality allows to register an RSS feeds from an External website. For instance, you can choose to display the specific feed from "http://www.unhcr.org" for your country.
- Go on http://www.unhcr.org.
- find your country page
- You should see in various places a RSS icons

Feeds are usually available for:
- Latest News
- UNHCR Fund raising Reports
- Background, Analysis and Policy
- Statistics
- UNHCR Maps
- UNHCR Partner Directory
- and other depending on the country
You may look at the RSS feed from OCHA through http://reliefweb.int/rss or http://www.humanitarianresponse.info/
The feed can be then displayed on the portal through the RSS module.
Note that the portal is also producing its own RSS feeds that can be used by external websites .
 Items from an RSS feed could replace the news or highlights module or could function as an additional source of information.
- In your browser, navigate to the page from where you want to import the RSS feed. Right click on the RSS icon and choose “Copy link address”
- Click on “Admin panel”
- Select “RSS Feeds”
- Click on “Add New RSS Feed”
- Select the level for your new feed to display. If it's not Regional, you can additionally define a specific page or choose the 'Appear on every pages' option. In this case, the feed will appear on every page of that level.
- The title field is optional, if it's omitted, the title will be pulled directly from the feed.
- Paste the feeds link.
- Define how many items you would like to see on the page.
- Click on “Submit query”
Configuration of the portal
Setting up the modules
Every portal page is assembled from various parts called modules. You can find the whole list of usable modules in the “Admin panel”, under “Modules”.
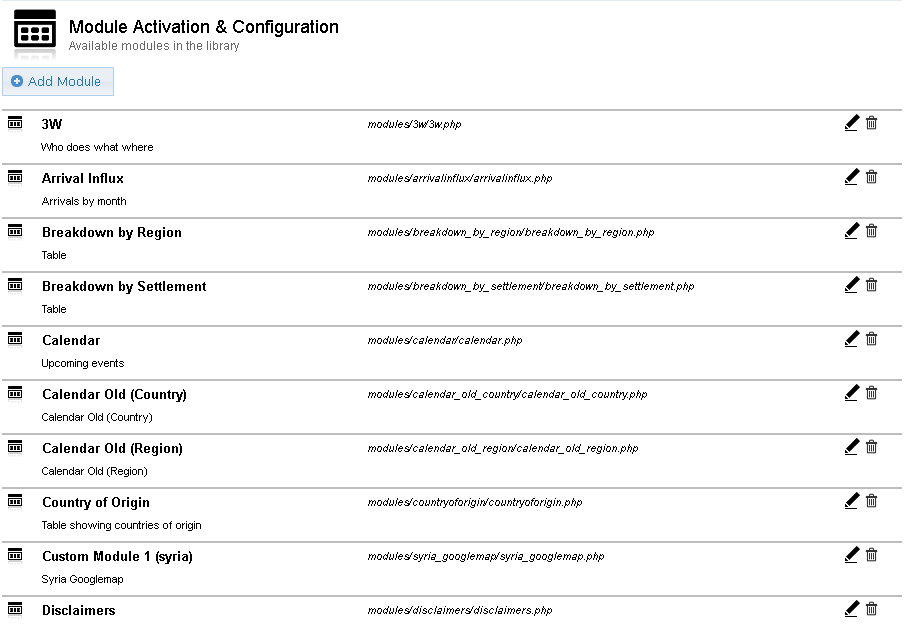
- Click on “Admin panel”
- Select “ Modules”
- Select the module you want to edit and click on the pencil icon.
- You can refine the positioning options .
- You can define the pages you'd like to make this module active and eligible on .
- If you are certain that you don't want to use a module on a specific page, make it unavailable for that level, or even for every level, but please do not delete modules, as you may need them later.
Modifying the layout
Layout configuration button are visible in each public pages.
The button appears when you are logged in with sufficient admin privileges.
You have to decide which modules would you like to use on which level and in what position. Some modules are 'stand-alone' , some have alternatives . You can define the order of the modules for every level, but for example if one of the countries has to have a different layout, it can be done by choosing to create a 'Custom layout' only for that location. You can define and customize the pages of the portal on every level with the flexible modules listed in Admin panel/Modules.
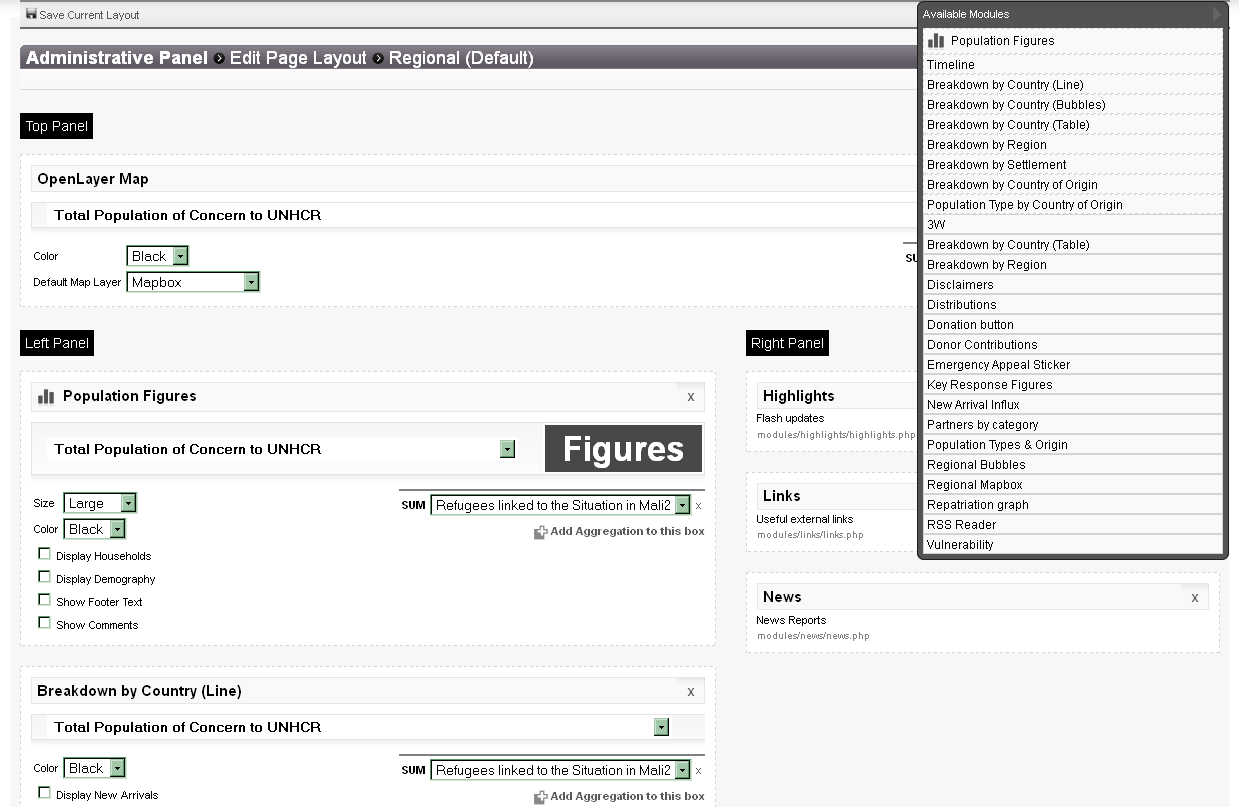
Note: in most cases, it's not enough to upload your data in the admin backend; you also have to enable the module on the 'Edit Page Layout' page, by dragging the module from the “Unused Modules” category and placing it in either the Left, Right or Top panels. If data is available, the module will now appear on the page you are editing - however, if there is no data available in the database, the module will not appear, regardless if it has been activated in the page layout.
- Navigate to the level you want to edit.
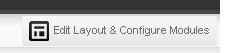
- Click on the “Edit Page Layout” button on the top right corner, next to the RSS feed button, then choose “Edit default layout”.
- On the left side, you can review the modules you currently don't use. On the right side, you can see the structure of the page, which has 3 parts: a top module, a left panel and a right panel.
- You can drag and drop modules anywhere you like. If a module is restricted to certain parts of the page , you'll see a warning message.
- The module Total population & Demography is not collapsible and intended to be placed at the top of the left panel.
Creating a custom layout
If you would like to have a location with different layout , you can define a custom layout only for that specific location.
- Navigate to the level you want to edit.
- Click on the “Edit Page Layout” button on the top right corner, next to the RSS feed button, then choose “Create a custom layout”.
- Make your changes.
- Click “Save layout”.
- With this you've removed this location from the scope of the levels default layout, so if you make any changes in the default, it won't affect this specific location.
Modifying titles and texts
Almost every title/text you can see on the portal can be customized under Admin panel/Label & Language text. You can search for the current text and/or the level. Please note: almost all of texts have a version on each level ! The title of the portal, titles of the modules, footer text and other pre-coded text can also be customized to fit the situation.
- Click on “Admin panel”
- Select “ Label & Language Text”
- You'll see a grid with all the available text of the portal in English and in French, grouped by the page on which they appear.
- You can use the search box at the top of every column to search for a specific text.
- To edit a text, click on the relevant box in the grid, then click on the pencil icon. You can change the text without doing it as well, but you'll only be able to save it if you select the pencil previously.
Publishing pages
Current page publishing settings include:
Regional
- Regional Portal
If this is switched to 'ON' there will be a regional page on opening the site - this setting should be used when there are multiple countries. If set to 'OFF', there will be no 'Regional Overview' button on the Navigation bar. On opening the instance, the landing page will redirect to the first country page in alphabetical order. This is suitable for instances which have only one country of interest.
- Refugee Bubbles - Show New Arrivals
If this is switched to 'ON' there will be bubbles in red showing new arrivals this year.
- Refugee Bubbles - Show Households
If this is switched to 'ON', household figures will appear below the population bubbles.
- Show Link to Partner List in Main Nav Bar
If this is switched to 'ON', columns showing new arrival figures will appear in the data tables.
- Show Map
If this is switched to 'ON', calendar will appear on the regional page.
Country
- Show New Arrivals
If this is switched to 'ON', columns showing new arrival figures will appear in the data tables.
REGION
- Show New Arrivals
If this is switched to 'ON', columns showing new arrival figures will appear in the data tables.
- Show Calendar
If this is switched to 'ON', calendar will appear on the regional page.
- Refugee Bubbles - Refugee Population Over Time
If this is switched to 'ON' there will be a graph showing growth of refugee population.
Settlement
- Show New Arrivals
If this is switched to 'ON', columns showing new arrival figures will appear in the data tables.
All site
- Publish Entire Site
If this is switched to 'Off' the entire site will redirect to a message indicating that the site is temporarily down for maintenance. This affects public users and admin level users. Only power admin users with access level will be able to access the site, including this setting page.
- Publish Facebook in footer
If this is switched to 'Off' the Facebook share will be shown
- Publish Twitter in footer
If this is switched to 'Off' the Twitter share will be shown
- Publish LinkedIn in footer
If this is switched to 'Off' the LinkedIn share will be shown
- Publish Google in footer (Switch to OFF for)
If this is switched to 'Off' the Google+ share will be shown h2. 2.4. Configuration of the maps The module allows the display of population figures at different geographic levels, as well as infrastructure such as warehouses, schools and health facilities. At a high zoom, the map uses Mapbox tiles – when zooming into detail, the map switches to an Open Street Maps layer. Clicking on the panel on the left side, allows you to control the visibility of different layers.
Instead of the default Mapbox tiles and Open Street Map layers, there is also an option to use the Bing Hybrid aerial maps.
Population can be displayed by Country, by Region or by Settlement
The default loading options for each page can be set from the Dashboard Settings. On the regional page, for example, you can set the page to load 'population by settlement' by default, instead of 'population by country'.
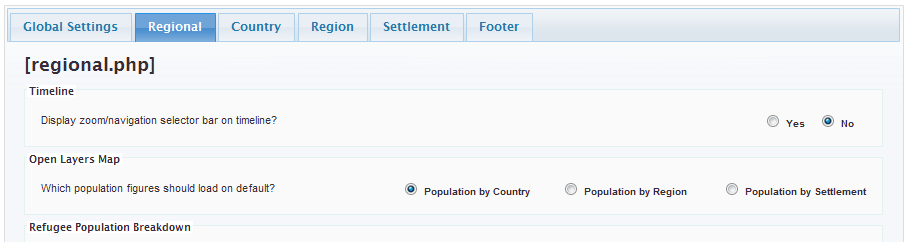
The module has a flexible layout and can appear in either the top, left or right panels. The position can be configured from the 'page layout' page.
If no high-level zoom data is available on Open Street Maps, you can change the Dashboard Settings, to force the map to switch to Bing Hybrid maps on higher zoom levels.
It is also possible to add infrastructure points, such as warehouses, schools, health centres, etc. This can be done from Location Settings —> Infrastructures, in the Admin Panel. Infrastructure layers can be turned on/off from the left-hand panel of the map.
Managing Users
Responsibilities

- The overall responsibility for the functioning and hosting of the web portal belongs to the Regional Support.
- The overall responsibility for the maintenance of the portal data pertaining to Country operations belongs to corresponding BO.
- The verification of portal data for particular sites is under the overall responsibility of the Head of Sub/Field Office responsible for the particular sites
- The provision of data for the portal is a collective responsibility belonging to UNHCR, partners and the Government.
- In consultation with their working group counterparts at the field level, Interagency Sectoral Working Groups at the Country level will recommend which indicators should display on the website and which assessment reports and other documents should be posted based on consensus in the group. These working groups may also recommend text for “Highlights” to be posted on the website.
- BO can veto the posting of a document on the portal if making the information public will compromise the protection or the refugees or reduce humanitarian space for any or all humanitarian actor(s)
- The Refugee Information Management Working Group at both the Country Level and the Field Level will assist in communicating technical issues about the website to interagency partners and assist in providing information to fill gaps on the website.
List of Actors
The following personnel are involved in clearing data that will be posted on the portal:
- The Executive (Representative, Deputy Representative)
- Senior Public Information Officer
- Head of Field Office
- Senior Protection Officer
- Senior Programme Officer
- Registration Officer (Country & Field Level)
- Chairs of Sectoral Working Groups
- Information Manager
Access levels
Currently there are 2 user levels on the portal: the PowerAdmin and the Admin. An Admin access is restricted in the sense that s/he can't edit all the codes used on the portal. With Admin access you can edit only codes for the following: * Key indicators
- Indicator unit types
- Relief items
- Your own login details
With PowerAdmin access you can edit (in addition to the previous ones):
- Dashboard settings
- Data & navigation matrix
- Modules library
- Language texts
- Repatriation types
- Document types
- Sectors
- Other users login details
Partners Access
Once a partner is recorded in the system, portal administrator can provide him a link to update or add new information.
From the admin panel, to get those links go to partners and then click on 'view' next to a partner, there you find the link.
Using that Encrypted Url, a partner can:
- edit its own profile
- edit its sectors and locations
- upload documents
Discussion on protected areas
Developing a protected system is NOT in the scope of the portal.There are 4 distinct business cases:
- Case 1. Because of its sensitivity the document and/or data need to be shared externally or internally but only to a limited number of identified person: in this case, one should use a mailing list and the current UNHCR email system
- Case 2. The document and/or data need to be shared only internally but widely: one can use either the UNHCR intranet or Yammer
- Case 3. The document and/or data serves Public Information goal, then one should put that document on either the UNHCR public website or a local Public website
- Case 4. The document and/or data need to be shared externally but specifically target implementing or operational partners, then one should use the data portal we are currently developing
The information sharing portal covers the case 4.
Codes management
Super Admin Users will have extra options to modify certain code values. 1. Click on “Admin panel” 2. Select the relevant option
Standard Codes
- population types
(1;'Refugees';'REF');
(2;'People in Refugee-Like Situations';'ROC');
(3;'IDPs';'IDP');
(4;'Asylum-Seekers';'ASY');
(5;'Refugee Returnees';'RET');
(6;'IDP Returnees';'RDP');
(7;'People in IDP-like Situations';'IOC');
(8;'Stateless';'STA');
(9;'Other Persons of Concern';'OTH');
(10;'Refugee Returnees (Annual)';'RET-A');
(11;'Not of Concern';'NOC');
(12;'Third Country Migrants (TCNs)';'NOC');
(13;'Vulnerable Host Communities'';'NOC');
- population data types
(1,'Awaiting Registration');
(2,'Registered');
(3,'Estimated');
(4,'Planning Figures');
- accomodation type
(1,'Refugee Camps/Centers','C');
(2,'Urban Areas','U');
(3,'Rural/Dispersed Areas','R');
(4,'Unknown','V');
(5,'Not Specified');
- settlement types
Is used to manage the codes for the types of settlements that are available. It could e.g. be Urban, Camp, Rural, etc.
(1, 'RP', 'Rural Population');
(2, 'UP', 'Urban Population');
(3, 'CP', 'Camp Population');
- source
(1, 'UNHCR');
(2, 'WFP');
(3, 'NGO');
(4, 'Government');
(5, 'Various/Other');
- legal
(1, '1951 UN Convention, 1967 Protocol', '');
(2, '1969 OAU Convention', 'If available data allow for a distinction of recognitions under Art. 1 (1) and 1 (2...');
(3, 'UNHCR Statute (1951 Conv.+extended def.)', '');
(4, 'Complementary protection', '');
(5, 'Temporary protection', 'Including 'humanitarian status', 'B-status', 'C-status', 'subsidiary protection', 'de facto', etc.');
(6, 'Other(explain)', '');
(7, 'Unknown', '');
- reason for leaving
(1, 'Insecurity');
(4, 'Drought');
(5, 'Eviction');
(6, 'Flood');
(10, 'Lack of livelihood');
(16, 'Clan Conflict');
(17, 'IDP Return');
(18, 'Fire');
(19, 'Forced Return');
- status
(1, 'Completed');
(2, 'Ongoing');
(3, 'Planned');
- uom (Unit Of measurement)
(1, 'EA', 'Each');
(2, 'SET', '');
(3, 'BTL', 'Bottle');
(4, 'TON', 'Tons');
(5, 'TIN', 'Tins');
- indval (Indicators value)
(2, '%')
(3, '')
(5, 'L')
(6, '/10,000/day')
(7, 'day(s)')
Operational Codes
- uploadcategory
(1, 'Maps')
(2, 'Updates')
(3, 'Statistics')
(4, 'Reports & Assessments')
(5, 'Funding')
- relief items
(1, 'BLANKET, 50-70% WOOL')
(2, 'BUCKET,METAL,WITH HANDLE,15-17')
(3, 'JERRYCAN,SEMI-COLLAPSIBLE,10 L')
(4, 'KITCHEN SET,TYPE A')
(5, 'MAT, SYNTHETIC SLEEPING')
(6, 'MOSQUITO NET')
(7, 'PLASTIC,TARPAULINS,4 X 5 M')
(8, 'PLASTIC, TARPAULINS, 4 X 25M')
(9, 'SOAP,TOILET')
(10, 'TENT, FAMILY')
(11, 'PAGNES')
(12, 'HYGENIE KIT')
(13, 'TENT,PLASTIC')
(14, 'JERRY CAN,NON-COLLAPSIBLE,10 L')
(15, 'JERRY CAN,NON-COLLAPSIBLE,20 L')
(16, 'JERRYCAN,COLLAPSIBLE,10 L')
(17, 'BASIN,30L')
(18, 'BASIN,POLYETHYLENE ,20L')
(19, 'BUCKET,GALVANISED STEEL,20L')
(20, 'BUCKET,HEAVY DUTY PLASTIC,10L')
(21, 'BUCKET,HEAVY DUTY PLASTIC,20L')
(22, 'MAT,WOVEN STRAW, 1.8 X 0.9 M')
(23, 'BLANKET,BABIES')
(24, 'BLANKET,HIGH THERMAL FLEECE')
(25, 'BLANKET,WOVEN DRY RAISED (TYPE')
(26, 'KITCHEN SET,INDIVIDUAL ITEMS')
(27, 'KITCHEN SET, TYPE B')
(28, 'TENT, ACCESSORIES')
(29, 'TENT,HOSPITAL,10 BEDS')
(30, 'TENT,SCHOOL')
(31, 'TENT,CANVAS,10 X 5 M, DOUBLE F')
(32, 'TENT,COTTON CANVAS/OUTER FLY')
(33, 'TENT,COTTON CANVAS/INNTER FLY')
(34, 'TENT,CONE SHAPED SHELTER STRUC')
(35, 'TENT,LIGHTWEIGHT EMERGENCY SHE')
(36, 'TENT,RIDGE,DOUBLE FOLD')
(37, 'SHEETING,PLASTIC,TRANSPARENT')
(38, 'PLASTIC,TARPAULINS,4M X 50M')
(39, 'MOSQUITO  NET DOMES')
(40, 'BUCKET,HEAVY DUTY PLASTIC,25L')
(41, 'JERRYCAN,PLASTIC,KEROSENE,10L')
(42, 'JERRYCAN, 20L W/SPOUT')
(43, 'ALL WEATHER TENT')
(44, 'BOX-TENT')
(45, 'BLANKETS (ADULTS) 2X2MTR')
(46, 'BLANKET SYNTHETIC')
(47, 'TENT (5X5M) SQUARE')
(48, 'BLANKET, COTTON FILLER')
(49, 'TENT, 10 PERSON')
(50, 'CANVAS TARPAULINS')
(51, 'BUCKET,HEAVY DUTY PLASTIC,15L')
(52, 'TENT, 30 PERSONS')
(53, 'TENT,RIDGE,DOUBLE FOLD  4x3')
(54, 'TARPAULIN COVER FOR BOAT')
(55, 'BUCKET, PLASTIC, 3L')
(56, 'AGRO NET 90% SHADING')
(57, 'BLANKET, SYNTHETIC (FLEECE) 1.')
(58, 'BLANKET, SYNTHETIC (FLEECE) 1.')
This populated from the official source of Core Relief Item from the Supply Unit
- sectors
(1, 'Nutrition')
(3, 'Health')
(4, 'Water & Sanitation')
(5, 'Protection')
(6, 'Food Security')
(7, 'Shelter')
(8, 'Camp Management')
(9, 'Community Services')
(10, 'Education')
(11, 'Environment')
(12, 'Livelihood')
(13, 'Core Relief Items (CRIs)')
(14, 'Registration')
(15, 'Gender-Based Violence')
(16, 'HIV/AIDS')
(17, 'Logistics')
(18, 'Child Protection')
(19, 'Agriculture')
(20, 'Telecom')
(21, 'Coordination')
(22, 'Transportation')
(23, 'Return')
(24, 'Reproductive Health')
(25, 'Mental Health and Psychosocial Support')
(26, 'Information Management')
(27, 'Cash Assistance')
Is used to manage which sectors are available for the 3W
(1, 'Nutrition')
(3, 'Health')
(4, 'Water & Sanitation')
(5, 'Protection')
(6, 'Food')
(7, 'Shelter')
(8, 'Camp Management')
(9, 'Community Services')
(10, 'Education')
(11, 'Environment')
(12, 'Livelihood')
(13, 'Core Relief Items (CRIs)')
(14, 'Registration')
(15, 'Gender-Based Violence')
(16, 'HIV/AIDS')
(17, 'Logistics')
(18, 'Child Protection')
(19, 'Agriculture')
(20, 'Telecom')
(21, 'null')
(22, 'Transportation')
(23, 'Return')
- indicators
(2, '% of households with adequate shelter')
(4, '% of Refugees Who Have Benefited From CRI Distributions')
(8, 'Average quantity of water available per person per day (litres)')
(9, 'Percentage of families with latrines')
(10, 'Percentage of refugee students enrolled in Grades 1-6')
(11, 'Percentage of population living within 200m from water point')
(12, 'Under 5 yrs mortality rate')
(13, 'Crude Mortality Rate')
(14, 'Number of persons per latrine')
(15, 'Number of persons per usable water tap')
(16, 'Skilled birth attendance at delivery')
(17, 'Number of consultations per trained clinician per day')
(18, 'SAM prevalence (6-59 Months)')
(19, 'GAM prevalence (6-59 Months)')
(20, 'Vaccination coverage against measles')
(21, 'Number of admissions to the CTC')
(22, 'Proportion des MUAC (<125mm) ')
(23, 'No. of days coverage of core relief items in event of influx of 10,000 persons per day')
(24, '% of identified vulnerable individuals receiving assistance')
(25, '% of identified sexual and gender-based violence (SGBV) survivors receiving requested assistance')
(26, '% of refugees with access to local health facilities')
(27, '% of total persons of concern covered by pre-positioned core relief items')
Is used to manage which types of indicators are available at the camp level. It also manages the Target Values.
Geographic Codes
- country
- configlocationlevel
Webservices
Webservices are accessible in each instance.
RSS Feed
In each page, you can click on the RSS icons to see the RSS feed for this page:
![]()
iCalendar
Icalendar is a specific type of webservice for Agenda. This webservice is still in development phase.
http://en.wikipedia.org/wiki/ICalendar
Quick Manuals
Visitor Statistics
There is an open-source software called Piwik which tracks visitors on our portals. Regional Information Management Officer colleagues can obtain an account from the portal team. There’s a function in Piwik to create automatic weekly updates and a distribution list of recipients. With these reports IM colleagues can distribute the statistics to a wider audience without the need of access to Piwik.